
Visual Studio Code - Bazel Workspace
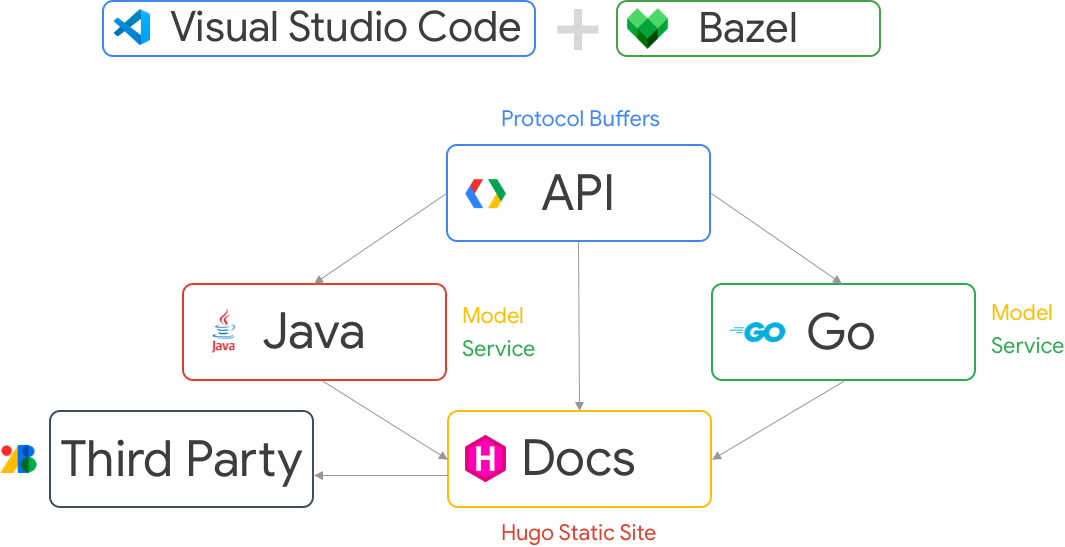
This repository contains an example project that uses Protocol Buffers (protobuf) to create a domain model and services. There are two example implementations, one in Go, the other in Java. The functionality is stubbed out, but shows how to build a multiple language project using Bazel. Lastly, it ties it all together with a predefined workspace and task to make it repeatable.
This repository IS NOT a general purpose tutorial for how to use Bazel, Visual Studio Code, Java, or Go. It is intended for those who want their IDE to work with a mono-repo / multi-project build system. That being said, I’ve attempted to add a README in each module to explain how it was built.
- Visual Studio Code (vscode) - Download and Install
- Bazel - Install Instructions
- Knowledge of your Terminal / Command Prompt
Once Bazel is installed, make sure you can execute
bazel helpfrom the terminal.
- :white_check_mark: Mac OS X
- :white_check_mark: Windows 10 with Windows Subsystem for Linux (WSL)
- :white_check_mark: Chrome OS (Version 105+) with Developer Linux Tools
- :x: Windows 10 Native - Not working due to path requirements.
In your home directory, create a folder called “projects”. This only matters due to some limitations in the workspace configuration file. Vscode extensions for Java and Go WILL NOT support variable expressions for paths.
# Create a projects directory, this example creates it on the /opt file system
# This IS NOT recommended, but is done so for the sake of a conistant development environment.
# Please feel free to put this any path you have access, but you need to remember for a couple of changes.
sudo mkdir /opt/projects

cd /opt/projects

# Clone the repository
git clone https://github.com/rrmcguinness/vscode-bazel-tutorial

# Run Bazel once before starting
bazel build //...

# Open Visual Studio Code

# If you changed the download location:
code .

# If you didn't change the download location:
code vscode-bazel-tutorial.code-workspace
Once Visual Studio Code has opened, edit the vscode-bazel-tutorial.code-workspace file.
Change all occurances of “/opt/projects” to your download directoy. DO NOT attempt to use variable, they ARE NOT honored by the extensions.
Lastly, in the java.configuration.runtimes, if you ARE NOT using Apple OS X, then please change _macos with _linux or _windows accordingly.
Again, this is because a relative path, and command variable expansion IS NOT supported by the workpace file. Otherwise ${command:os_type} would work.
Once that change has been made, you may either “open workspace from file”, or close and reopen from the terminal with the last command above.
Navigate to java > src > service > CustomerService.java and open it.
When you open this file, it will start the Java Language Server, this will in-turn read the workspace file to determine where to find Java, and which dependencies to add to the classpath. ** More about that below.
- When you ran
bazel build //..., bazel read the .bazelrc file in this directory. - .bazelrc instructed bazel to download all of the dependencies to the
builddirectory under projects.- The dependency cache is placed here so we can reference our GoLang, Java, Protobuf, and Downloaded dependencies using relative paths.
- Bazel then reads the WORKSPACE, and each recursive BUILD file to create a set of dependencies, this includes all of the binaries for Java, Go, etc.
- You either had the right directory, or you made some changes and edited the workspace.
- This is how the Java and Go environments are setup, so it’s pretty important.
- Again, with the workspace limitations, Java Projects MAY NOT have multiple Java dependencies, this ONLY impacts the IDEs ability to do auto complete, but DOES NOT represent the compile or runtime dependencies. This MAY cause problems.
- api - This is where the protocol buffer files are located.
- conf - These are configuration files used by Bazel.
- docs - a Hugo website (WIP).
- golang - The Go Project implementing the generated APIs.
- java - The Java Project implementing the generated APIS.
- third_party - A best practice directory for storing third_party assets.
- tools - Helper scripts for VSCode to utilize Go with Bazel.
- vscode-bazel-tutorial.code-workspace - responsible for configuring vscode.
- WORKSPACE - responsible for dependency management in Bazel.
- api/BUILD - the build file for the API model and GRPC.
- golang/BUILD - the Go build file with dependencies on the API.
- java/BUILD - the Java build file with dependencies on the API.
Just so you know what’s happening behind the scenes when we execute bazel build //.... From above, we have a rough understanding, this section will provide a little more detail, starting from the WORKSPACE.
- As bazel reads the workspace, it determines which languages and features will be supported. From top to bottom:
- Protocol Buffers
- The Protol Buffer Tool Chain (Protoc)
- GRPC
- GRPC Documentation Generator
- Go Toolchain (version 1.19.1)
- Gazelle (A build and dependency helper for bazel)
- Go GRPC rules.
- The Java Tool Chain (Java 17)
- The internal Maven Tool Chain
- The project Maven Dependencies
- Hugo Site Generation Tools
- A Hug Theme (GeekDoc)
- Onces those tool chains have been loaded, each directory BUILD file is read, and a dependency graph is created. That dependency graph determines the build order.
- API - Is built first because Java and Go depend on it, it uses the GRPC toolchain.
- Java - Is built, using the Java Toolchain, maven dependencies, and the protocol definitions. The output of the generated files are in the ‘build’ directory.
- Go - Is built, using the Go Tool Chain, and the dependencies from the Gazelle (go_deps.bzl) file.
- The docs directory is built using the Hugo toolchain and theme.